
|
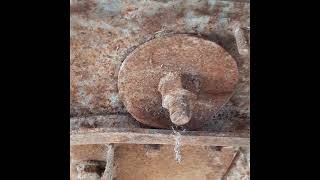
Today was a bit all over the place. I removed the steering rack and column from the car, which, along with the front brake lines, were the only mechanical pieces left on the body. I did this mostly on video, so there aren't a lot of photos. But the video is informative, I hope. Also, I set up the rotisserie pivots and tack-welded them together. Because my welder is, well, crap, I would rather not risk producing welds with poor (or no) penetration on pieces that will be supporting the weight of the car. A friend of mine has a good stick welder that gets plenty hot, so there is no need to take chances. I likely will replace this welder in the not too distant future, but for now, it's good for sheet metal. I wouldn't trust it with anything heavier or more structural than that. The video is here  Steering rack removal and Rotisserie pivots video I should also mention that I bought a bunch of used parts from a gentleman in the USA. They arrived just recently, as well. I got beehive lights (original in box!), a washer fluid bottle, telescoping arm for the bonnet, a replacement for my heater box and heater/battery shelf, and some other bits and bobs. Check out the photos below.
0 Comments
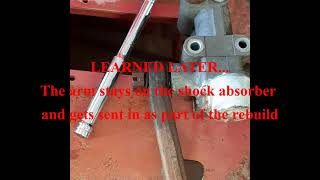
Wow, it's been a while. I pulled my shocks out in late December and sent them off before Jan 1. I got the rest of the front end taken apart a short time later. Then life got in the way of the car stuff. The cold didn't help, either. I have a single garage, with no room to work unless the main door is open, so the weather needs to be somewhat cooperative. And here it is... April. The weather is now nice enough to do some work outside. Before getting started on the actual car, I built a cart to roll it around. I also built the two main legs for the rotisserie. Lumber prices are going crazy right now what with COVID and all, and I had a chance to get some at the old prices, so I jumped on it. Plans for the cart are here: (NOTE: I tried to get some free CAD software to work, but its all geared toward 3D modelling, and I just wanted a simple drafting app. No luck. Nothing. So I drew it by hand and scanned it. Same for the rotisserie.) 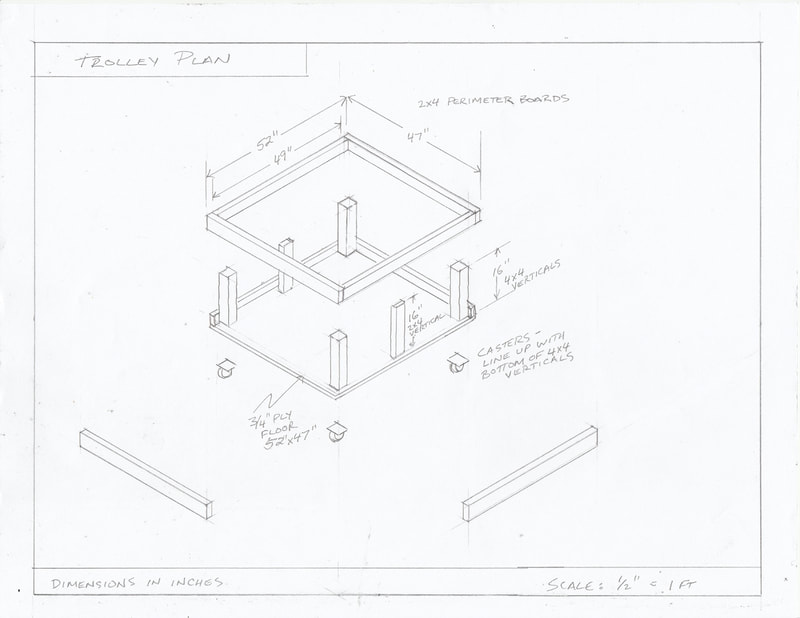 And here are the plans for the rotisserie  Basically, these are all built with 4x4s, 2x4s, and lag bolts. One sheet of 1/2" plywood was also used. The rotisserie mounting/pivot assemblies are covered in another video/blog post, but I know what I'm going to do with them, so they are also included on the plan. Once the cart was made, it took myself and one buddy to lift the car (with the rear end/diff/axle and springs still attached), while my wife wheeled the cart under the car. We set it down basically right on the pinch welds, and it fit perfectly. The rear end removal was a pain. Actually, the axles and diff assembly came out rather easily. But the radius arms had some rust issues with a few of the bolts, so that took a while. A couple of the bolts didn't survive, and will require replacement. I was planning on replacing all the suspension bolts anyway, so no big loss. One of them will have to be drilled, though, so I'll have to figure out how to do that without damaging the radius arm mounting bracket. The YouTube video is HERE 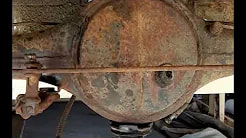 Rear end disassembly video link After tearing down the front end and sending the shocks for rebuild, I got on the horn with a couple of vendors, who were very helpful. Gerard from Gerard's Garage was a wealth of information, and greatly informed my decisions when it came to the front end. I knew I wanted to swap in disc brakes on the front. Thus the purchase of the front end as shown previously. But Gerard was great in helping to fill in the blanks. Which parts should be replaced? Which ones can be refurbished? Which ones are necessary/not necessary for the conversion to the different hubs and steering that goes with the front brake change? Through this process, I ordered a bunch of parts through Gerard. This way, I was sure everything would be compatible, as the front end is certainly not something I wish to assemble with any guesswork. Parts ordered from Gerard included front discs, calipers, pads, steel braided brake lines, wheel bearings, tie rod ends, and lower A Arms. The A Arms are the higher quality ones. I ordered these because my old A Arms, which I originally thought were ok, had quite a bit of corrosion in the pivot areas and threads. While I was at it, I also had Gerard re-sleeve my original master cylinder to 3/4 inch in order to accomodate the front disc conversion. Because of this change, I elected to not use the stock Bugeye rear wheel cylinders (which are designed for a 7/8 in bore master cylinder), but instead replace them with appropriate, 3/4 inch rear wheel cylinders. These also came from Gerard's Garage, along with a new clutch slave cylinder. The other vendor I spoke with was Dave from The Bugeye Guy. He offers a complete major front end rebuild kit, including kingpins, bushings, pivots, etc. I had him include poly bushings for the front end. While I was at it, I also ordered his complete set of screws/fasteners to attach the cockpit surrounds. All of these parts arrived today. It's quite like Christmas! Here we are, one week after the shock absorber adventure. It's still REALLY FREAKIN' COLD! But I have a day or two off, so let's get the rest of this front end apart before I forget what all the different parts are or where they go. Once again, this is a procedure that is better suited to video than photos. Plus my wife, Ali, was available and (sort of) willing to help out by holding my phone/camera. I really should apologize for the quality of the vids I've produced. I'm not a film major. Of course, if you have watched the videos, you also know I'm not much of a mechanic, either! Nonetheless, the front suspension is now out. And nobody got hurt (amazingly!) I wish that the last panic was not on a stat holiday, so I would have had access to the proper tools. Canadian Tire, which is a big auto-parts chain in Canada, has a program where you can borrow a tool, use it, and return it in a day or two. This service is free. However, I could not borrow the spring compressor on Jan 1st because they were closed. However, they are open now, and the spring compressor is available, making for a much safer situation. Still, there had to be a glitch. Normally, the spring seat would unbolt from the lower A-arm, allowing the spring to either a) drop down through the hole, or b) clear the "hump" on the spring seat and come out the side. A couple of the A-arms had bolts that were frozen, preventing the removal of the spring seat. This led to a more "persuasive" method of removal. No one ever said I was smart. But the front end is off now. The steering rack and column are still in place, for now. As are the rear springs and differential. But other than that, the car is basically down to the tub. VIDEO HERE: https://youtu.be/PWyMu7qpRcY 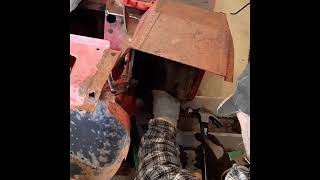 Well then. So we had a bit of an unexpected time crunch fall upon us with regards to the Austin. I was phoning about yesterday, just trying to find information on different stuff and generally update my to-do list and timeline, when I happened to call Worldwide Auto Parts. The plan was always that Pete Caldwell would rebuild my old shocks, as he has a great reputation and has come highly recommended by pretty much everyone I've spoken to in the Austin Healey world. Since we are in the middle of a cold snap, I thought I'd make arrangements to have some of this stuff done during the winter, so it will be ready to install back onto the body when it is done. My discussion with Peter was brief (it was New Years Eve, after all!), but the general takeaway was that the new year would see new pricing. Fair enough, he hadn't raised prices in a dog's age, and deserves to make a living. However, he also told me that if I could get the shocks sent away in the next day or so, that he would honour his old pricing. PANIC! Now I've got to get the shocks off the car, boxed, and sent! One of the front shocks is already off (it was pulled while my brother and I were trying to figure out why the drivers' side front suspension was staying compressed even after the weight of the engine was removed.) Turns out the front shock itself was frozen solid. OK, so one shock is off, but that still leaves three others on the one car, plus the two shocks on the new front end. My original thought was to send all six shocks, and if the frozen one was too far gone, no harm done. My review of shipping rates later changed that, and I wound up sending the two original rear shocks along with the two working shocks from the new front end. The biggest issue with all of this is that in the normal progression of front end disassembly, the shock absorber is most definitely NOT the first part you want to remove. This led to some... interesting... solutions to problems. So there I was, outside in my unheated garage on New Years Day, swearing happily away at the Heirloom Austin suspension. I don't have many photos of this, but I do have the process on video. The vids are broken down into two parts... Front and Rear. I'll do a step by step description in the Technical (tips and tricks) section of the website shortly. Until then... VIDEO HERE: Getting Our Shocks Off, Part 1 - REAR https://youtu.be/Y7oLBS-RiZg Getting Our Shocks Off, Part 2 - FRONT https://youtu.be/l7CYNYRbwkc Not much here, really. I just did some checking. As most car guys know, every jurisdiction is a bit different when it comes to licensing requirements.
I used to live in a different province. In my old home, if you wanted "Vintage" or "Antique" plates on your car, you needed to provide proof that it was all original. Engine, suspension, the works. Some safety modifications were allowed, such as adding seat belts or even disc brakes (if they were a factory option in that year), but everything had to be approved. Or you could get "Collector" plates for modified vehicles, but they, too, were severely restricted. So, the other day, I decided to find out if I could, in fact, do my disc brake conversion on the Austin and still get Vintage plates in my current location. Turns out that Saskatchewan is pretty easy going on the mods. Not only can I add my disc brakes and seat belts, but it turns out I don't even need the original drivetrain. As long as my serial number is more than 30 years old (as a 1959 model, it qualifies), I'm good. I can even put a 1275 and ribcase gearbox in her if I so choose. Actually, I could put in an LS if I wanted to, but that seems a tad... well... stupid and reckless. But it would be exciting to drive. When you push on the gas, and you don't know if the car is going to slew right, left, or straight up in the air, that's exciting! But I am now considering the 1275 swap, as opposed to the original 948 and smooth case. I'm open to thoughts. So a few days ago I was surfing Facebook, and I saw someone offering up a set of Bugeye floors, along with inner and outer sills for sale. The price was very reasonable, especially for Heritage parts, so I messaged the gent. It sounded good, so I followed up with a phone call, and we got talking about our projects. I definitely wanted the floors, as they would save me a ton of time and effort fabricating new ones. At the price he was selling them, it would have cost me almost as much for the raw materials, so it made sense. During our conversation, Ian (the seller) asked me about my plans for the front end. I told him I was considering a disc brake upgrade (largely due to my brother's ill-fated adventure with water and the front brakes of this car), but that it was a big cost and I was weighing it carefully. That's when he dropped the bomb. It seems he had a parts car/tub, which he had acquired for the rear half, along with the engine. He had basically cut the car in half at the firewall, and didn't need the front end. It had disc brakes. Would I be interested? HELL YES! He lives about 9 hours drive from me. For those of you in Britain, that seems like a lot. In Canada, not so much. Remember, driving from coast to coast in Canada is 4025 miles (6,500 km). To put that in perspective, London to Moscow is 1798 miles on the M1. (per Google). So for us Canadian folk, 9 hours is a nice Sunday drive. So I borrowed my friend's pickup truck and drove out to Ian's house. The front end was everything promised. It has disc brakes, but no master cylinder. Oh well. I would have wanted to replace that anyway. It also has the full front suspension, steering rack, and enough sheet metal for me to make as many patches as I like. Plus I bought the floors and sills. Oh, and while we were talking, I noticed several steel bonnets on his wall. One of the parts I need to replace is the front apron below the grille. It is very damaged from my brother's meeting with the pole mentioned way back when in the car's history. So I asked him about cutting the apron out of one of his bonnets. He said no, too much work. Just load up the entire bonnet. YAY! And then he threw in a heater/blower motor with a cracked plastic housing. I can fix that, and save another bundle! Overall, Ian was awesome. He has more parts. But I'm not publicizing them here, as I may still go back and get some more! And then when I got home, my wife helped me use my engine hoist to unload it. Only downside... I got a photo radar ticket on the way back. Yeah, it was my buddy's truck so he got the ticket. But I paid him for it. It's only fair, really. VIDEO HERE: us using his small front-end loader to put the thing on the back of the pickup truck is here... https://youtu.be/YqyVb3OsKfk 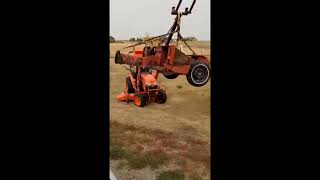 As the title says, I continue to take parts off the car, labelling and bagging each one. After everything is off, I will go through it bit by bit, inventorying and assessing each part as I build my "shopping list" and my "keep it list" Disassembly is reasonably straight forward, so no need for explanations here. But I will post a couple of videos. And a lot of photos. These are mostly for my own reference so I can see where things go when I try to reassemble everything. I must say, though, that I was shocked at how easily the old girl came apart. Of course I had some issues here and there, but overall there were very few rusted/stripped/broken fasteners. Most of them came out with a shot of penetrating oil and patience with the ratchet. The vast majority were able to be removed with my air ratchet, without damage. As noted previously, everything that came off the car was "bagged and tagged" for future assessment as to whether it will be cleaned up, replaced, or upgraded. On another note, I got keys cut from Triple C Motor Accessories. I used the number on my ignition barrel, and ordered the keys by that number. They fit perfectly and turn smoothly in my ignition switch. I also ordered leather, vinyl, and carpet samples from AH Spares, Moss, and AHead4Healeys. Those have started to arrive. Before I put up all the pics, I thought I'd give a link to the compilation video I put together. It shows a walkaround body assessment, and then several short vids for referencing where some of the bits go. I figure I might need this during reassembly. Video HERE: https://youtu.be/Zst0TJ-6hs8 on YouTube 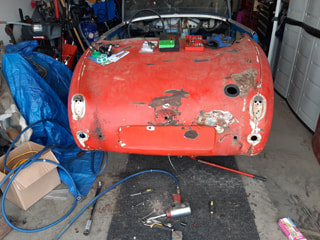 Well, something very cool happened, which will save me a ton of work. I was searching around for different parts suppliers, surfing parts catalogs... you know, all the general stuff that we do when trying to avoid doing something productive. During the course of my surfing, I found a supplier in Ontario called Autofarm. (see links page) These guys do a bunch of stuff, mostly to do with big Healeys, but they are also getting into the Sprite end of things. The owner is tearing down a Bugeye parts car, and will have the rear shroud available as a used part. I jumped on it right away. I also sent them a preliminary list of parts I may be needing, and got back an estimate on cost. But right now, I'm super into that shroud coming in! I was concerned about fabricating the part. Smaller bits are fine, but something the whole width of the car, a couple of feet long, and which needs to be perfectly symmetrical with compound curves... that's a bit of an ask. I would have done it, but now I don't have to. Welding her in will be See Spot Run stuff by comparison. And, while I wait, the disassembly begins in earnest. VIDEO HERE: My free version of Weebly hosting does not allow me to post videos directly to the page, unfortunately. But here is a link to my YouTube video from the above paragraphs.... youtu.be/ChorrRj93os 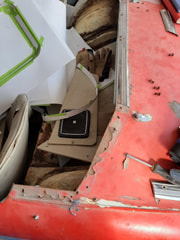 Click on image to see video This past weekend, I finally got around to separating the gearbox from the engine and am about to mount the engine on a stand, except that I need to get two bolts to properly mount it. I have removed the clutch and flywheel. I cannot believe how little oil there is around the rear crankshaft seal. I expected a big leak, but it's virtually dry! (see pics) I'd like some opinions on whether or not this clutch is reusable, as the car only has 37000 miles on it (according to my brother. Less if I go by the odometer, which has not -- to my knowledge-- been altered), and there seems lots of meat left. I just don't know about it because of its age. Another big surprise for me is how light the gearbox is. I can pick it up and fling it about like nothing. I swear, the flywheel is heavier! Once the engine is mounted, I'll strip the carbs and bits off of it. I'll probably do all the gaskets (except maybe the head gasket... we'll see how the compression test goes. I won't tear it any further apart than I have to.) Also next up, removing the suspension from the body and send the shocks for rebuild. UPDATE--- I can't seem to get a proper compression reading without having a starter motor attached. I tried an electric drill on the harmonic balancer, but the compression with the tester in (plugs out) is too high to allow the drill to turn properly. I guess that's a good sign. Still need to tear it all apart, though. Rough summer for me, just like for many other people. Other priorities will supplant work on the car for a while. |
AuthorMy name is Ash. Archives
September 2021
Categories
All
|
 RSS Feed
